Thanks for visiting!
This blog is where I share stories behind the images, thoughts on the creative process, and insights into the gear and techniques I use.
Whether you're here for inspiration, curiosity, or connection, I hope you find something that resonates. Feel free to explore, comment, and come along for the journey.
London July 2026
London, July 2026
Despite its proximity to my home in Ireland, London is a destination I have only visited twice before in my lifetime. The first time was in the early noughties, when I went over with my younger brother for a few days while he prepared himself for a summer working as a barman in The Star Tavern in Belgravia, a pub famously associated with the Great Train Robbery of 1963.
The second time was a decade later for a stag do. On neither occasion was I remotely interested in street photography. I was just there for the experience and the craic, as we Irish would say.
This trip was different. I’m much longer in the tooth now and have a different mindset. When visiting big cities around the world, I now want two things from the experience: the first is always photography, followed closely by visiting as many art galleries as possible in the time I have.
I planned a four-day trip, basing myself on Grimsby Street in Shoreditch, just off Brick Lane. I primarily chose the area because of its proximity to Liverpool Street Station, where you can get the train to Stansted Airport. My apartment was just a 15-minute walk from the station and a 13-minute walk from Aldgate East Underground station on the District line.

Shoreditch and Street Photography
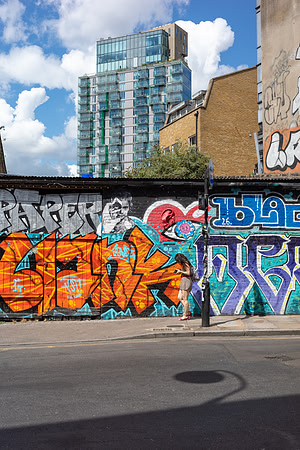
To be honest, I didn’t really know much about the area apart from some scant research online. I was pleasantly surprised when I got there by the amount of quality graffiti and the hip, urban, youthful vibe of the place.
Shoreditch is well worth a visit if you are in London and planning to do some street photography. The area oozes creativity, with some of the finest street art I’ve seen in an urban area. This acts as a perfect backdrop to a hip and bustling street life that is every street photographer’s dream.
Apart from exploring Shoreditch, I also explored parts of the South Bank, Westminster, Covent Garden and Soho.
I visited three major galleries while in London: Tate Modern, Tate Britain and the National Gallery on Trafalgar Square. Each gallery was visited on a separate day to make the experience more pleasurable. Of the three, the National Gallery was my favourite, with an outstanding collection of works from medieval times to early modernism.
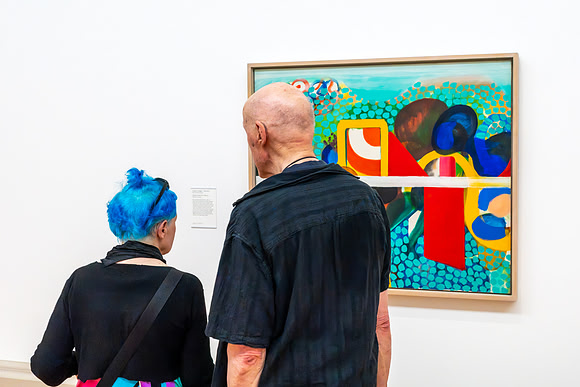
I only managed to take one decent photo in the three galleries I visited. The photo captures a couple: a shaven-headed older man and an older woman with blue hair. The woman’s blue hair and the colours in her skirt echo the colours in the painting behind her. This is either coincidence, or the woman is a Hodgkin fan. Hard to know really, but I was there at the right time to make the connection.
Learning to See
As I mature as a photographer, I take fewer and fewer photographs. It’s not because I have lost my appetite for the art form; it’s just that I have a greater awareness of what will work as a photograph. Coming home with one or two good photos in a day is OK with me, instead of a hundred average ones.
To be honest, it is a lottery with the way I work. I simply plan what route I am taking on the day and what I want to see. What presents itself in front of my eyes is predictable in terms of the built environment, but I have no control over the people who inhabit that space. So, it’s pot luck really.
There is an unpredictability to that approach, but an excitement as well. You have no idea who will present themselves to you at a specific time in a specific location. The good thing about that, and about street photography, is that your photos are unique to you. Despite photographing in the same locations as countless other photographers, the people who inhabit these spaces at that particular moment are unique to your photograph.
The more I do photography, specifically street photography, the more I find out about myself. I’m an observer. I notice things. I scan what is around me and make decisions about what is worth capturing. It’s a reaction to visual stimuli that resonate with me for one reason or another. What we choose to photograph is shaped by what we have seen and learned in the past, so inevitably there is something of ourselves in the photographs we make.
The brain works very quickly in street photography situations. Often, you only have seconds to react to something that presents itself in front of you. Sometimes you instinctively know there is a photograph there, even if your conscious brain hasn’t quite figured out why yet. I have often come back to the studio and discovered connections in photographs that I wasn’t consciously aware of when I took them.
I remember taking a photo in Brussels of a guy wearing a jacket with a red skeleton on the back. At the time, I was simply intrigued by the jacket. When I got back to the studio, I noticed a sign in the background that said ‘Back Factory’. Somehow, I had managed to position the guy’s jacket and the sign perfectly within the composition, yet I had absolutely no recollection of seeing the sign when I took the photograph.
You could dismiss that as coincidence, but I’m not so sure. I have been making images for a long time, from my art school days in the mid-nineties to the present day. After all those years of looking, composing and making images, I think you become wired to see certain visual connections. Sometimes the eye reacts before the conscious mind catches up.
The same thing happened with the photograph I took of the woman standing in front of the Howard Hodgkin painting in Tate Britain. I took the photograph instinctively. At the time, it didn’t fully register with me that the blue of her hair and the colours in her skirt echoed the colours in Hodgkin’s painting. The connection only became fully apparent later when I looked at the image on my laptop.
The Discreet Camera
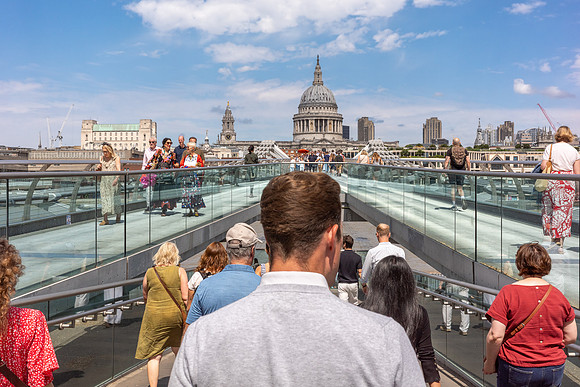
For this trip, I only brought my Ricoh GR IIIx with its 40mm lens. This little camera makes me look like a tourist from a bygone age, resembling a point-and-shoot camera from the early noughties. I’m not sure that this illusion really works. It’s the stare that’s the giveaway that you are a photographer. People are not usually looking so hard at what is in front of them. People on the street can see you for what you are: a magpie looking for trinkets.
That said, the GR is far more discreet than the Canon 5D Mark III I once used. You can sometimes fool the public into thinking you are just another tourist and that you are photographing something other than them: some architectural feature, or just a snapshot memory that will end up on a hard drive, never to be seen again.
There is a certain amount of dishonesty to this approach, a sneakiness, if you will. It often plays on my conscience and, on occasion, has taken away from the enjoyment of taking photos. You get that look sometimes when a person, or persons, realise you have deliberately captured them. It can feel uncomfortable.
Capturing everyday life as it unfolds is the objective, so by its nature, street photography must involve a degree of discretion and purposefulness if you want to capture genuinely candid moments. I truly believe in this genre of photography. For me, it is the most exciting and, on occasion, gratifying approach to making pictures. There is an unpredictability to it that keeps me coming back for more.
Camera Settings
Let’s talk a little bit about settings. I know some photographers would rather hear about the technical side of things than the philosophical and moral side of photography.
I remember doing a talk to a camera club over a decade ago after returning from a trip to Iceland. As I was talking to the group, I noticed some of the members sitting with folded arms. I was wondering to myself, what am I doing wrong? Was my presentation not interesting?
What I didn’t realise was that they weren’t too interested in me talking about concepts and ideas or my approach to making photographs. They just wanted to know what gear I used and how I post-processed my imagery. So, I learned my lesson, and here is some information on my camera settings.
Camera: Ricoh GR IIIx – 40mm fixed lens
Exposure settings:
- Aperture: f/11 – I get plenty of depth of field with this aperture.
- Shutter speed: 1/400 sec – I can freeze people moving relatively fast with this shutter speed.
- ISO: Auto – I let the camera figure out the ISO after setting the aperture and the slowest shutter speed I want the camera to use.
I work in Aperture Priority mode (Av), and in the ISO menu settings I have the minimum shutter speed set to 1/400 sec. I set the focus to Auto-area AF but sometimes switch to Zone Focus, which I have set to 2.5 metres. I have customised the Fn button to switch between autofocus and zone focusing.
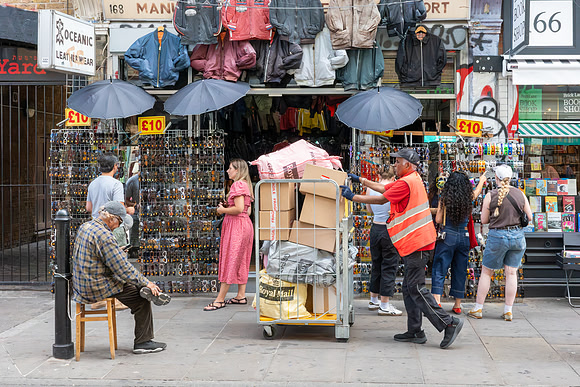
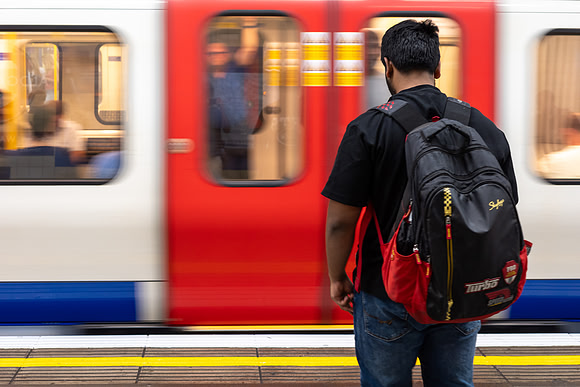
If I’m doing panning or long exposures, I switch to Tv mode and adjust the shutter speed to the desired duration for the effect I want. For panning shots, I usually set the shutter speed to around 1/8 sec. For some of the photos I took at the Tube station, I set the shutter speed between 1/4 and 1/20 sec, depending on how much blur I wanted.
The Ricoh GR IIIx has in-body image stabilisation (IBIS) built in, so you can hand-hold the camera at slower shutter speeds and get that combination of sharp and blurred elements in the photograph without using a tripod.
London – I’ll Be Back
Going back to London, this time with the intention of taking photographs, has whetted my appetite for more. Four days barely scratched the surface. It’s a massive city, and for a street photographer the constant flow of people against an ever-changing urban backdrop means there is always the possibility of a photograph around the next corner.
That, I think, is what will bring me back. There are still so many parts of London I haven’t explored and countless photographs that, for now, simply haven’t presented themselves to me.
Hopefully, I’ll be back soon.
See all images taken on my London trip here:
https://www.kevinlangan.ie/london
Ricoh GR Put to the test in Edinburgh - July 2025

This blog post is a reflection on the usability of my Ricoh GR IIIx for street photography. I bought the camera in August 2022, but I hadn’t truly put it through its paces until a recent trip to Edinburgh in mid-July.
I chose this pocketable compact camera mainly for its small size. From experience, I’ve found that if you're trying to take candid photos of strangers, pointing a larger camera in their face is a sure way to ruin that "fly on the wall" approach you’re aiming for.
Early Street Photography Experience
I first dipped my toe into street photography in 2013 during a trip to China, visiting both Shanghai and Beijing—two vast urban environments where photographing people became a natural choice. I used my Canon 5D III on that trip, a real workhorse over the years. I still use it occasionally, but for street photography, it’s simply too heavy—especially paired with the 24–70mm zoom lens. It’s also too conspicuous unless you're shooting from a distance with a longer lens.
In 2016, I bought my first mirrorless camera: the Olympus OM-D E-M5 II, a 16MP Micro Four Thirds camera with a 24–80mm f/2.8 lens. The body is very small and light, but the metal zoom lens adds a lot of bulk. While I could’ve switched to primes, I preferred the versatility of the zoom and its focal range. Despite liking the operational layout of the camera, it’s still a bit too noticeable on the street. Image quality also struggles, particularly in low light, and the 16MP resolution limits my ability to crop.
I haven’t given up on this Olympus—it served as a backup in Edinburgh this summer.
Back to the Ricoh GR IIIx
The GR IIIx is light, compact, comfortable to handle, and delivers surprisingly good image quality. It also has a touchscreen, zone focus capabilities, decent autofocus, and a suite of features that make it a powerful little camera. I chose the GR IIIx version specifically for its 40mm equivalent lens, which suits how I see the world on the street—neither too wide nor too zoomed in. A kind of “Goldilocks” focal length. The GR III offers a 28mm fixed lens, but that felt a bit too wide for my taste.
Camera Set-Up for Street Photography
Here’s how I typically set up the Ricoh for street photography:
- Shooting Mode: Aperture Priority (90% of the time)
- Aperture: f/8–f/11
- ISO: Auto (capped at ISO 6400)
- Minimum Shutter Speed: 1/250s (to freeze motion)
This setup ensures sharp images of people in motion and maintains image quality.
As for focusing, I alternate between:
- Centre-weighted autofocus
- Touchscreen focus and snap
- Zone focusing, which was a big reason I chose this camera. Setting a specific focus distance that locks in every time you press the shutter makes it ideal for quick, reactive shooting.
For metering, I switch between:
- Multi-Segment
- Highlight-Weighted (which gives a high-contrast look with dark shadows and well-exposed highlights)
If needed, I use exposure compensation (EV) to underexpose by up to a stop. The EV dial is conveniently located near your thumb, making real-time adjustments easy.
Button customisation is another strength of the GR:
- Fn button: Toggles between autofocus and zone focusing
- Video button: Reassigned to adjust zone focus distance
This custom setup makes switching focus modes fast and efficient.
LCD vs. EVF Experience
The Ricoh doesn’t have an EVF—only an LCD screen. You can, however, attach an optical viewfinder to the hot shoe (which I did), mainly for use in bright conditions. While handy, it’s not super accurate—more of a framing estimate.
Personally, I miss having an EVF. I prefer the immersive experience of looking through a viewfinder, with all the real-time data and framing precision. It helps me feel slightly detached from my surroundings, which lessens the awkwardness of photographing strangers.
This became clear when I used my Olympus again—looking through its EVF, I instantly felt more in control of framing and more comfortable in general.
The Ethics and Emotions of Street Photography
This raises deeper questions about my relationship with my subjects. My approach is mostly detached and non-engaging. I rarely speak to the people I photograph or acknowledge them. That’s the nature of candid photography: it’s reportage—documenting moments in time without interference.
The Ricoh enhances this approach. It has the look of a point-and-shoot camera from the late '90s to early 2000s. It's unobtrusive, devoid of flashy colours (depending on your ring cap choice), and doesn’t scream “professional.” If anything, it makes me look like someone using a cheap, outdated camera—which is exactly what you want to remain discreet and invisible.

Accessories
Before my Edinburgh trip, I picked up two accessories:
- External Viewfinder (Ricoh GV-3)
Ricoh GV-3 Viewfinder
Useful in bright light but somewhat overpriced. A “nice to have,” not a necessity. - Squarehood Lens Hood (from Sweden)
Squarehood Product Page
This is a well-made lens hood with anti-scratch glass and glare coating. It’s designed to protect the sensor from dust, a known issue with the Ricoh’s retractable lens. The only downside: it makes the camera more noticeable. I may not keep it on all the time, but it’s an excellent dust deterrent.
Final Thoughts and Future Gear Goals
The Ricoh helps me blend in—it’s like holding a camera that doesn’t announce itself. It’s small, lightweight, capable, and full of thoughtful features for street and general photography.
That said, I’m considering an upgrade to a full-frame, high-megapixel compact camera. Two models I’m eyeing:
- Leica Q3
- Sony A7CR
Both feature 60MP full-frame sensors. The Leica is fixed-lens (28mm or 43mm versions), while the Sony supports interchangeable lenses.
Leica Q3 vs. Sony A7CR: Pros & Cons
Leica Q3 – Pros:
- Stunning image quality (60MP full-frame sensor)
- Iconic, minimalist design with superb ergonomics
- Built-in 28mm f/1.7 Summilux lens
- Fast, intuitive shooting for street work
- Exceptional colour science
Leica Q3 – Cons:
- Fixed lens limits versatility
- Very expensive
- Slower autofocus, fewer features compared to Sony
Sony A7CR – Pros:
- Compact with interchangeable lenses
- Top-tier 61MP full-frame sensor
- Advanced autofocus and subject tracking
- Great for video and hybrid shooters
- IBIS and broad lens compatibility
Sony A7CR – Cons:
- Cluttered menus and less intuitive ergonomics
- Less emotional or tactile shooting experience
- Build feels more functional than luxurious
The Leica Q3 is for purists who want to hold something beautiful, simple, and be part of the Leica mystique.
The Sony A7CR is a versatile technical powerhouse—small, fast, and feature-packed.
For now, I’m still waiting for the perfect camera: compact, good-looking, lightweight, with stunning image quality, IBIS, killer autofocus—and maybe the ability to make my dinner and clean the house while it's at it...
A Scene from Another Time: The Mystery Under Pont Neuf
 It was the evening of June twenty-second, twenty twenty-two, in Paris. The city was alive with its usual charm as I strolled across the iconic Pont Neuf bridge with my partner, en route to the Eiffel Tower. The golden light of the setting sun bathed the Seine in a soft glow, creating an almost cinematic backdrop for an ordinary summer evening. But then, something caught my eye—something extraordinary.
Far below the bridge, near the entrance to a public toilet, a curious tableau unfolded. From a distance, my attention was drawn to one figure in particular—a man with a newspaper tucked under his arm, his hat tilted just so. His posture, his attire, the very air around him—it all seemed out of place, as though he’d stepped out of another era. As I looked closer, I realized he wasn’t alone.
There were others: a man emerging from the toilet, hurriedly zipping up his fly; another leaning casually against the wall near the entrance, his suede jacket catching the light; a third, standing with an old pushbike, observing the scene with a quiet intensity. Above them, on the staircase, a final figure lounged against the railing, watching everything with what I can only describe as calculated nonchalance.
In that moment, instinct took over. I turned to my partner, who had also noticed the scene, and without a word, I bolted. Racing down the bridge, camera in hand, I knew I couldn’t let this pass me by. Seven frames—that’s all I managed before the spell broke and the characters began to disperse. Seven frames to capture a mystery I’m still trying to unravel.
The more my partner and I observed, the stranger it all seemed. Were we witnessing a film set? The vintage clothing, the old bicycle, the deliberate postures—it all felt staged, too perfect to be real. Yet there was no sign of a crew, no cameras, no directors calling the shots. This wasn’t scripted; it was life, raw and unfiltered, playing out in a way that felt almost impossible.
So, what was happening? We speculated endlessly. Was it a drug deal? Male prostitution? Or perhaps it was nothing more than a series of innocent coincidences? Each character seemed to play a role. The man at the toilet entrance appeared to be keeping watch. The cyclist, dressed similarly, seemed to share the same duty. The man with the hat and newspaper watched the one zipping up his fly with a peculiar curiosity, while the figure above on the stairs had a vantage point over it all. It was a scene heavy with ambiguity, and the unanswered questions only made it more compelling.
And then there’s the detail that makes this image even more intriguing. In the upper right corner, almost easy to miss, is the only modern element in the frame: a sprite of street art subtly breaking the spell of timelessness. Without it, this scene could easily transport you back to the early twentieth century. That tiny splash of modernity is a reminder that, as surreal as this moment felt, it was still very much rooted in the present.
Looking back, I realize this is what I love most about photography: its ability to freeze a fleeting moment, to capture the unscripted and the inexplicable. This image is a slice of Parisian life, but also something more—a story without a beginning or an end, inviting the viewer to step in and fill the gaps with their own imagination.
So, what do you see in this photograph? Is it an innocent scene, an unfolding drama, or something else entirely? Let me know in the comments below. The mystery continues, and perhaps together, we can unravel it.
The Obsession with Self - Paris 2022
A lot has changed since I was in Paris over a decade ago. Not in a physical sense, but more in human terms, specifically the growing obsession with self.
Being an observer of life and a documenter of the surroundings I find myself in, I am always curious about human nature, in particular how people act in public spaces and the trends they follow.
One of the big trends since the invention of social media like Snapchat and Instagram has been the selfie. The selfie is nothing new, it has been around since the 15th c if you consider self-portraits painted by artists selfies. Fast forward to the mid 19th c with the invention of the camera and the development of the 35mm system in the early 20th c, capturing a perfect likeness of ones-self became a lot more accessible. In recent times digital cameras especially camera phones have made it even easier, with dedicated lenses at the front of the phone for selfies.
As a child my mother owned a twin lens reflex camera, which I believe she got a present of in the 60’s. All our childhood photos were taken on this camera, the usual family snaps on our holidays and family events. Never once was the camera turned on the person holding the camera for a quick selfie. On one hand, this would be very difficult given the viewing mechanism on this type of camera; it wouldn’t have been impossible, but the notion would never have entered our heads at the time. Fast froward to today with the proliferation of cameras, especially smart phones, everyone takes selfies, some more than others.

In the early 1960s Andy Warhol was an early exponent of the selfie. Warhol took a vast number of self-portraits, including photographs, silkscreen prints and Polaroid prints. In early 2014, Huffington Post reported that Andy Warhol is “The Original King of Selfies.” Warhol was well aware of the vehicle that drives celebrity, that being the photographic image. While living and working in New York, he began a series of portraits of celebrities including Marilyn Monroe, Elizabeth Taylor, Elvis Presley and Jackie Kennedy. Warhol took images of these celebrities from magazines, newspapers, or directly from publicity photographs. This meant he could reproduce images already in the public eye, such as publicity shots or tabloid photographs. The technique also allowed him to easily produce multiple versions and variations of the prints.
Warhol was one of the first artist to draw attention to what fame is. Warhol said,"In the future, everyone will be world-famous for 15 minutes." Never has this statement been so true than today. Social media has provided us with a platform for that 15 minutes of fame, an easy vehicle to distribute the selfie in a number of poses and locations. Warhol was well aware what makes people famous, taking pre-existing photos of celebrities, enlarging and multiplying them and altering their colour, he not only made unique art form out of them, but he also attributed to the act of celebrity.

The very nature of celebrity has changes has changed since I was a young man growing up in the 70’s and 80’s. Before the advent of the smartphones and the social media, celebrity was primarily the domain of the entertainment and sport industry. To become a celebrity you had to have a skills as an actor or a sport star for instance. In today’s media saturated society the act of creating celebrity is much more accessible for everyone. Young people especially have coped-on to the fact that fame can be attained without any talent or skill; all they have to do is present themselves in environments and situations that promote the idea that they are leading an exciting glamourise life, just like the influencers they follow on social media. That 15mins of fame that Warhol predicted is now more than every attainable for anyone with a smartphone.
I first really started to notice the selfie in 2015 on a trip to Brussels. There, I say my first selfie stick in operation in the Grand Place with two tourists taking photos of themselves with the backdrop of some impressive Gothic and Baroque buildings. Since that time I have taken an interest in the selfie culture and have often taken photos of selfie takers in the streets around Europe and further afield. On my recent trip to Paris I saw the selfie go from a casual snapshot of oneself on location, to a considered and much more purposeful activity. The act of posing among young girls and not so young , not just once, but multiple times, with a backdrop of importance both visually and contextually seemed the norm. Around the usual tourist attractions like the Eiffel Tower, The Louvre, etc., I witnesses a plethora of girls, dressed to the nines getting their photo taken with these impressive structures. Nothing new about this, but some of these girls had a series of outfit and a range of accessories for their ‘fashion shoot’. I also came across several young girl, no older than 16 being photographed by their mothers, some more scantily dressed than others.

Even the galleries did not escape the act of selfie taking. In The Louvre, Musée d'Orsayand the Pompidou I witnessed the act of selfie. One particular woman in her 40’s accompanied by a young man with blue hair whisked around from painting to painting without actually looking at the work, or knowing who the artist was to take selfies of the woman with the painting as the backdrop. I observed her for a while and noticed that she must have taken a selfie with every know artwork in the gallery. It was ridiculous to watch and highlighted the absurdity of the selfie culture. Having paid the price of admission surely you would invest time in looking at the artworks and trying to learn something about the artists. All this didn’t seem to matter to this woman, all she wanted was an interesting background for her ‘duck face’ selfies.
It seems like the experience of the tangible physical world doesn’t seem to be as important to some people anymore. Our lives have become more and more digitised and we are at the mercy of likes, comments and emojis. What happens outside the realm of Instagram, Facebook and YouTube doesn’t matter as much as having a million followers and an online presence. The selfie will always have its place in society, but hopefully too does the real life self!
Italy 2019
Italy August 2019 - Ten days three Cities
Rome, Florence and Pisa, three cities with a lot to offer a photographer.
My journey started in Rome where I stayed for five nights, followed by Florence for three night and Pisa for two night.
My daily routine started with a hearty breakfast at my hotel. Usually I was on the road by 8.30-9am, so I could visit the attractions before the mid-day sun. While I was there the hottest temperature got up to 38, so it was essential to get out early to avoid the extreme midday sun. In the afternoon I would return to the hotel, have some lunch and take a rest. By 5-6pm, I would be raring to go again.
All three cities are beautiful with their own character and energy. Rome is vast with such attractions as the Colesseum, the Forum, Pantheon, Trevi Fountain and the Spanish Steps to name but a few attractions. Florence is a lot smaller, but very beautiful with so much to offer in terms of Renaissance art and architecture. Pisa, the smallest city of the three has its obvious attraction, the Leaning Tower, a really attractive building with the added attraction of its 40º + lean.
All three cities are great for photographers, and offer so much in terms of the built environment and street life.

Camera Gear
On this trip I took my 5DIII, a Tampon 24-70 f/2.8 lens, a Canon 17-40 f/4 lens, a Canon 70-200 f/4 lens, a Loewpro sling bag, a Benro travel tripod, a 7-Stopper ND circular filter, a remote shutter release, and that it!
Camera Settings
Street Photography: Armed with my 5DIII and my Tamron 24-70mm lens, I start by setting my exposure mode to Aperture Priority. I set my aperture to f/8, ISO to 400 and keep an eye on the shutter speed depending on the lighting conditions. This is just a starting point for me, and I constantly adjust the aperture and ISO depending on the look I want and the brightness of where I am photographing. If I am photographing in bright light, I will reduce the ISO to 100, and if photographing in darker areas, I will increase the ISO to whatever value gives me the desired shutter speed to freeze the action. Outdoors, I went up to 800 ISO on occasions, especially in dark alleyways. With the aperture setting, I usually try to get sharp detail throughout the image, so I would shoot at f/8 to f/11. These apertures record light using the best part of the lens glass, and offer the sharpest results.

Night Photography/Long Exposures: All the long exposures were taken in the blue hour, that period of twilight before it get dark. I would have a set location where I wanted to photograph, and know the best time to hit that location to get the best results. Equipment wise I only used my Benro tripod, my Canon 5DIII, a remote shutter release and my Tamron 24-70 F/2.8, or Canon 17-40 f/4 lens. My camera exposure mode was set to manual, aperture was usually set to between f/8 and f/11, ISO to 50-100, and the shutter speed varied depending on the light.
Approach
Street Photography: With my street photos I am looking for things that interest me visually and intellectually. Humour is a big part of my photography, so I am constantly on the lookout for quirky humorous happenings around me. I have no real plan when taking street photos apart for the route I'm taking. Things just happen around you, and you have to be quick off the mark to capture them. Sometimes, I may approach a person of interest to photography them, but this is rare. For me, the great thing about street photography is the randomness of it. You just have to get out and walk around and open your eyes to the possibilities. That said, it always takes me a few hours to get back in the groove. Photographing complete strangers in public, often up close, takes a bit of nerve and savvy, and if you are not doing it everyday it take a while to get back into it.
Night Photography/Long Exposures: Every city I go to, I usually have a few locations lined-up for special attention. I will have done my homework long before I arrive on location. This usually comprises of notes on possible viewpoints, equipment required, time to be there and how to get there. I usually aim for only of one or two an evening, because of the fleeting light restrictions.

Conclusion
If you haven't been to any of these three magnificent cities you are missing out. All three offer so much for a photographer and are easy to get around. When you do decide to go, just remember to bring good walking shoes. Rome in particular is rough underfoot with cobbled streets in places. In the time I was there, I covered 110km on foot, so I was glad I had comfortable shoes on. Overall, I am happy with the work I did there and the experiences I had. Until next time, arrivederci amici miei!
Brussels, Belgium - July/Aug 2015
I recently made a short trip to Brussels with no expectations of what to find there bar a few landmark buildings. I didn't do a lot of research for this trip and was pleasantly surprised with what I found.
Brussels is a beautiful city with a mix of old and new buildings, wide pedestrian streets, lots of parks and great food and drink. It is a city that is rich in cultural diversity and a city that has great photographic potential.
Over the three days there I took total of 966 photos, mostly while walking around the city, with a few photos shot on a tripod. 966 photos seems like a lot in three days, but the number is testament to the rich variety of photography subjects there and my trigger-happy sensibility. I generally shoot a lot anyway when in a new location and a city like Brussels offer so much for the street photographer that it is hard to put the camera down.

I am relatively new to street photography and have grown to love it over the last couple of years. I love the experience of that it has to offer; the thrill of capturing a moment on the street that will never be repeated again. The main skill in street photography is anticipation. You have to be alert to possible photographic situations and position yourself at the right angle to get the shot. You also have to be primed and ready with your camera. In street photography you have to shoot at high shutter speeds to freeze the action in front of the lens. In bright mid-day light shooting at high shutter speeds is not a problem, it's when the light drops that the problem’s arise. Normally during the day I have my ISO set between 200-400; aperture on average is f/8, and I like my shutter speeds not to drop below 1/500's. As it gets darker it's a compromise between image quality and shutter speed. If I was to leave my aperture set to f/8 and my ISO set between 200-400, my shutter speed would drop as the light dropped. To counteract this I may open the lens a couple of stops and up the ISO to 800 and if necessary to 1000 or more. The downside of increasing the ISO is loss of image quality, but its best to get a sharp grainy image than a blurry less grainy one.

Primed and ready with my 5D III, I hit the streets of Brussels ready to shoot anything that caught my eye. Walking along Boulevard Adolphe Max towards the city, I entered the new pedestrian zone in the city centre. This development has only been implemented since June, so my timing was good to visit the city. The area covers 50 hectares and is one of the largest pedestrian zones in Europe. It was designed to encourage kid's and adults to spend more time outdoors doing activities. They have ping-pong tables, giant chess sets, boules pits, a skateboarding park, badminton nets and many more recreation activities for the public. They also have large pallet assemblages for people to climb and to sit on. The great thing about a public area like this is that it attracts all kinds of people and they all in one place. I spent some time in this area photographing the various activities and people of interest. I was even treated to some beautiful gospel singing from a group of young black people. Apart from their impressive singing, they were beautifully dressed and made great subjects for me to photograph.

Grand Place in the centre of Brussels is also an excellent place for street and architecture photography. It was packed each day I was there with tourists from all over the world. The selfie stick was out in force with a lot of the tourists, a phenomenon that has really taken hold in the last year or so. The square itself is surrounded by beautiful Gothic and Baroque buildings dating from the 17th c. It is a UNESCO World Heritage Site and a site that is steeped in history. I was particularly struck by the Breadhouse building, currently the Museum of the City of Brussels, with its eerie looking facade. The building itself holds the history and folklore of the city and it also holds all the costumes for the Mannekin Pis, the famous little statue of a boy going for a pee in Brussels.

On my final day in Brussels I visited the Atomium. The Atomium was built for the 1958 World Fair. It was designed by the engineer André Waterkeyn and architects André and Jean Polak, and it stands 102m tall. This architectural marvel is like no other I have seen. With its nine intersecting reflective sphere, it looks more like a spaceship than a building. The day I visited the Automium it was particularly nice and sunny, which added to the reflective nature of the spheres, and made for great photography.

This was my first visit to Brussels and I must admit I enjoyed the experience. The city itself is beautiful and pedestrian friendly and it is a joy to walk around in. If you are into street and architecture photography you are in for a treat, with a great mix of cultures and a good mix of old and new architecture of merit.
Finally I would like to recommend the MaxHotel on boulevard Adolphe Max where I stayed for three days. This is a self-service hotel that doesn't have a front desk or a breakfast room, but it is in a great location and is very comfortable and cheap. For three nights board I payed €153 including the city tax. So if you want a no frills place to stay, thats is centrally located and comfortable, well then this is the place for you.
#brussels #belgium #streetphotography #architecturephotography #atomium #photography
Trip to New York, June 2015
New York City, the Big Apple, the home of the Empire States, the Chrysler Building, the Brooklyn Bridge, Times Square, Central Park, the Statue of Liberty and so on. It's a city we all are familiar with even if we never have been there. Television shows such as Taxi, Cagney & Lacey, Seinfeld, NYPD Blue, Friends, Sex and the City, along with films such as Taxi Driver, Saturday Night Fever, Manhattan, Wall Street and Goodfellas to name but a few, have all added to our familiarity of one of the greatest cities in the world. Now finally I got my chance to experience the city in real-time and boy was I not disappointed.
As usual, before the trip I made a shortlist of the landmarks I wanted to photograph. These included the Chrysler Building, the Empire States Building, Grand Central Terminal, the Brooklyn Bridge, Times Square, and Central Park, Chinatown, SoHo and many more. Along with those landmarks I panned to shoot a lot of street photography, to capture the most important part of the city, its people.
I started my trip with two days in Long Island before heading in to Manhattan where I was based for five days. The two days in Long Island were a nice way to easy myself into American culture before the hustle and bustle of New York City.

Manhattan Day One
Located on east 55th Street, between 2nd and 3rd avenue, we rented a nice apartment on the 5th floor that was a perfect location to explore the city.
On my first night in New York I went to the observation deck at the Rockefeller Centre to photograph the Empire State Building. I got there around 7:30 and didn't get up to the observation deck until an hour later. Luckily it was still in the blue hour and I managed to get off a few good shots of the Empire State and Downtown Manhattan before it got dark. The Top of the Rock is one of the best places to view New York City from above. Looking south you have great views of Midtown and Downtown Manhattan; looking north you have a great view of Central Park and beyond.

Manhattan Day Two
On day two I explored the Midtown area, starting with a walk down 3rd Avenue heading towards Brynt Park. On the way I was afforded a wonderful view of the Chrysler building from the intersection of 42nd and 3rd Avenue. I stopped there for a while and backed myself into a corner, put on my wide-angle lens, framed the shot and waited for some foreground action in the form of human activity. The great thing New York City is that you don’t have to wait long before someone or something of interest comes along for you to shoot.

On reaching Brynt Park, a small park between Fifth and Sixth Avenues and between 40th and 42nd Streets in Midtown Manhattan, I was immediately captured with how beautiful the park is. Nestles under towering buildings, the park with its perfectly manicured law as its centre piece, is a great place to chill-out, have a bite to eat and people-watch. The park is popular with visitors and locals alike and a perfect place to capture all manner of people, from business professionals to people living on the street.
After spending some time there, I wondered over to Grand Central Terminal to photograph the Main Concourse from a central point on the stairs. Following this I made my way over to Time Square to see what all the fuss was about.
Time Square reminded me of when I was in China for National Day in 2013; It was jointed. There was multitudes of Elmo’s, Sponge Bob’s, Spider Mans, Batman’s and all manner of characters there, along with hoards of tourists that made that place a bit too hectic for my liking. I couldn’t make sense of it really, I think that fact that it was sweltering hot day didn’t help either. So my first experience of Time Square wasn’t good and I didn’t get any shots of note apart from catching a bunch of cartoon characters off guard on the intersection of 45th and 7th Avenue.

After spending as little time as possible in Time Square I made my way to the lobby of the Chrysler building for a gander. I have always loved this building for it Art Deco beauty, and getting to see it in reality didn’t disappoint. The lobby is beautifully ornate with marble walls, a sienna-coloured floor and a mural on the ceiling dedicated to the construction process of the building itself. The upper parts of the building are off limits considering that this is a working building, which is a shame considering that when the building was first built opened in 1930, there was an observation deck on the 71st floor.
Manhattan Day Three
Day three started with a visit to MOMA to have a look at their impressive collection of modern art. The collection is well worth the entrance fee of $25, with famous works by artists such as Van Gogh, Matisse, Salvador Dali, Jackson Pollock, William de Kooning, Andy Warhol and many more. There was also had a temporary photographic exhibition on display there when I visited. It was an exhibition of the associated Bauhaus photographers Grete Stern and Horacio Coppola. I knew nothing of these two modernist photographers, but I was glad I got to experience their impressive work especially the work of Grete Stern. Stern photomontages and portraits were truly inspirational and a class above anything I have seen in a while.
The second part of that day was spent Downtown, firstly in Chinatown, then Little Italy, followed by SoHo and finally a walk over the Brooklyn Bridge. Downtown has a distinct different feel to it than the rest of Manhattan. Neighbourhoods like Chinatown, Little Italy, SoHo, the Financial District all have their own unique atmosphere and style. I was particularly impressed with SoHo, taking particular interest in the cast-iron building’s there. I even got a history lesson on their construction and restoration of the buildings from a man on the street who saw me photographing them. Who says New Yorkers aren’t friendly!

Next up was the Brooklyn Bridge. I had planned to walk to the other side and take photos under the bridge, but I left it too late and had to settle for what I could photograph on the bridge itself. To be honest you can get some great shots on the bridge itself. There are great views of Lower Manhattan, the Bay area, the Manhattan Bridge and of the skyline in Midtown Manhattan. You can also get good shots of the structure of the bridge and the intricate cable web system that helps support it. Apart from photographing the structure of the bridge, there was a lot of human activity on the bridge as I crossed. All manner of people cross the bridge from commuters, tourists, joggers, cyclists and of course photographers. As I crossed there was a mock wedding shoot by an Asian photographers that I crashed. The bride happily posed for me as I shot of a few frames while the photographer was changing his lens. As I made my past her I thanked her for her cooperation and gave her a nice smile.

On my final full day in New York City, a particularly hot one, I decided to head to Central Park for the day. Central Park is a beautiful park in the central part of the borough of Manhattan. It is a beautiful spot to get away from the rush of city life and has a lot to offer in terms of activities and scenic beauty. Entering the park on the South side at the intersection of 59th Street and 5th Avenue, I meandered my way through the park on my way to Strawberry Fields, an area dedicated the memory of the John Lennon. Located directly across from where Lennon lived for the latter part of his life until his death in 1980 (west 72nd Street), this memorial site has a focal point of a circular mosaic with the words ‘imagine’ inlaid in stone taken from his famous 1971 single release of the same name.
Like all attractions in New York it was busy with tourists. When I was there the mosaic was encircled with hoards of people taking turns to get their photo taken next to the ‘imagine’ inscription. It was near impossible to capture the mosaic without someone standing on it, so I decided to photograph visitors to the site from behind as they stood on the mosaic. As I was standing there with my camera settings dialled in, a beautiful blonde woman entered the circular mosaic and started to twirl around for a film crew. Luckily I was in the right spot at the right time to get off a number of shots of this attractive woman as she span. You know the old phrase that’ good things come to those who wait,' well in this case it rang true.

After that stroke of luck I headed to the lake area of the park where I photographed activities on the lake, people of interest around the area and I gatecrashed another wedding, this time a real one. The couple getting hitched were having their ceremony in the Ladies Pavilion next to the lake, a nice spot for a small ceremony such as this. The pavilion is a popular spot with wedding ceremonies and an ideal location for wedding photography. Having taking a couple of frames with my camera set to silent shooting I headed off again towards the South entrance, finally stopping off at a volleyball match that took my interest for the sheer athleticism of the players.
That evening I headed out with friends for a few drinks and got talking to a local about the phenomenon of ‘Manhattan Henge’. Also ferreted to as the ‘Manhattan Solstice,’ it is a natural event happening around the summer solstice, where the setting sun aligns east-west street grid of Manhattan. After some discussion on the event, my friends and I decided to see it we could experience ‘Manhattan Gate’ for ourselves. From where we were on 3rd Avenue we headed east on 42nd street to the intersection of 1st Avenue. There we met a photographer who told us we missed this natural phenomena by about ten minutes. Naturally we were a bit disappointed but after a few more drinks all was forgotten. It would have been a bonus to capture such an event while I was in town, but I was happy with what I had captured over the few days to not beat myself up too much about missing this opportunity.
New York City left wanting for more, I loved everything about it. The impressive skyline, the hustle and bustle of the streets, the food, the mix of cultures and most of all the opportunity for great photography. I’ll be back in the near future without a doubt. New York City has made such a good impression on me that it will be hard top pop. Until next time, ‘have nice day!’
Equipment used on this Trip
On this trip I travelled light carrying only one camera, my Canon 5D III and three lenses.
Most of the photos I took on the trip were with my Tamron 24-70mm f/2.8 walk-around-lens. I also used my Canon 17-40mm lens for shots where I needed a wider angle lens than my Tamron.
For the trip I purposely bought a Lowepro sling bag that I carried my spare lenses in and a gorilla tripod that proved totally inadequate for my hefty DSLR. I highly recommend the sling bag for street photography, even though it was a bit small for my 5D. It would be ideal for a smaller DSLR or a mirrorless camera. Nice zip pouch inside for holding a wallet or other valuables. It also has a handy water bottle pouch that has easy access on the outside.
I also brought my Benro tripod travel tripod with me for longer exposure shots and night photography. I had read before travelling that tripods were prohibited in a lot of areas around the city unless you had a permit for use. From my experience after my first trip there, I know this not to be entirely true. I personally witnessed photographers use tripods in Grand Central Station, the Bottom of the Rockefeller Centre and Brooklyn Bridge without any hassle. That said, I recommend that you still bring a mini tripod with you that can support your camera adequately. The gorfillapod tripod I used proved inadequate at the ‘top of the Rock’ with the wind that we experienced there. These type of tripods will work fine when there is no wind, but when the wind catches a large DSLR on top of one of these flimsy tripods there’s ‘a whole lot of shaking going on!’
Word on Street Photographic Technique
When doing street photography a good starting point for me regrading camera settings would be:
Mode: Aperture Priority
Aperture: f/8
ISO: 400
Shutter Speed: Above 1/125 s
As you well know what shutter speed we can shoot with is determined by the aperture setting and the ISO setting, so depending on the light I constantly monitoring what shutter speeds the camera is recorded when I have dialled in my aperture and ISO. If it falls below 1/125 s I will either open the aperture or boost the ISO depending on what type of shot I want.
Most of the street shot I took on this trip were shot between ISO 400 and ISO 800. The aperture varied depending on the subject and distance to subject, and as I said I tried to keep my shutter speed high to avoid blur.
Digital Distraction!

Of late, I have been thinking a lot about how I create images and the tools I use to do so.
Currently I shoot digitally with a Canon 5D III. This is a great camera that allows me to shoot successfully in a variety of conditions and photographic situations. Prior to this I was the proud owner of a Canon AV-1 film camera, that I still have today.
Now before I get into crux of this blog post, I just want to say that I think the 5D III is an excellent camera, one that provides superb image quality and works great in low light conditions. My gripe is not with a particular digital camera model, it is with digital photography itself.
At this point I want to go back in time to the mid to late 90’s. In 1995 I bought my first SLR camera the Canon AV-1. The AV-1 is a single-lens reflex camera introduced into the market by Canon in 1979. This particular model is not capable of fully manual exposure. It is an aperture priority camera, which allows the user to set the aperture setting and the camera automatically set the shutter speed. I used this camera right through Art school, and I’m happy to note that I still have it today with the three lenses I used back then; a 50mm, a 28mm and a 135mm lens.
As I mentioned, my AV-1 camera is an aperture priority camera; you set the desired aperture, you looked through the viewfinder, you manually focused the lens, and when you were ready you take the picture. There is little distraction with this camera, it was designed to be simple. It allowed the photographer to control the amount of depth-of-field in the shot and the camera would do the rest.
This brings me on to the main point of this blog. In my experience this simple SLR camera has less distraction when taking photographs than my current digital SLR cameras. I can say with certainty, that when I used this camera, I was far more concentrated as a photographer than I am with my current DSLR. One of the greatest distractions I find with digital cameras is the ability to instantly review photos after they have been taken. Looking at the back of the camera every time you take a photo often lead to missed photographic opportunities. When I shot with film that distraction wasn’t there. You took the photo, wound the film, and when the film ran out you then either changed the film or sent it off to the lab for processing.

Shooting with a film camera I believe was a more precise art. One wasn’t firing off photo after photo in the hope that one image would turn out ok. Instead the photographer waited for the decisive moment when all the elements were right to get the ‘perfect shot’. Of course the film photographer had to know his/her craft to get the perfect shot. But once the required knowledge of the workings of the camera was attained, the photographer was freed up to concentrate on the most important aspect of photography, the photographic image itself.
When I teach photography I always tell my students that it is not the camera that distinguishes a good or bad photographer, it is what the photographer does with the camera that is important. A prime example of this can be seen in the work of the Japanese Street photographer Daido Moriyama. Moriyama takes amazing photos with just a simple point-and-shoot pocket camera. He prefers to work with a smaller unobtrusive camera because he can get more natural street images without drawing attention to the fact that he is a photographer. When I was student I can’t remember having any conservation with my tutors about the type of camera I used. When a tutor talked to me about my work they would only refer to the images I had up in my studio space and what I was trying to say as a photographer. They didn’t give a damn whether I was using large format, medium format, 35mm, Canon, Nikon , etc. All that mattered was that I was producing images with a clear intention, images that spoke visually and intellectually.
To finish I’d like to say that I’m not advocating that everyone throws away their digital camera and get a film camera, or bins their DSLR for a compact camera. What I’m trying to say in a round about fashion, is that photography should first and foremost be about the image and the camera should be a secondary consideration. Having the latest DSLR camera won’t make you a better photographer. In fact the complexity of such a camera can often distract from the real purpose of photography, which is to create photographs. If you want to learn to be a good photographer your time would be best served looking the work of the great photographers. Photographers such as Henri Cartier-Bresson, Robert Frank, Brassai, Ernst Hass, Ansel Adams, Steve McCurry, Michael Kenna to name but a few. Study the compositional techniques they use, the type of light they shoot in, the subject matter they choose to shoot. Learn by looking, and don't let the camera get in the way of improving you photography.
“I like to look at pictures, all kinds. And all those things you absorb come out subconsciously one way or another. You’ll be taking photographs and suddenly know that you have resources from having looked at a lot of them before. There is no way you can avoid this. But this kind of subconscious influence is good, and it certainly can work for one. In fact, the more pictures you see, the better you are as a photographer.”
– Robert Mapplethorpe
Notes:
You can find some of the photographers I admire here: http://www.pinterest.com/langanphoto
DigitalRev Cheap Camera Challenges with photojournalist Alex Ogle - Proof that you don't need a fancy camera to take good images!
All artwork on my website now available to order!

Tutorial Lightroom - Retouching photos by Serge Ramelli
I found this Lightroom 4 tutorial on Petapixel.com...Personally I think the final image is pushed too far, but it will show you what is capable in Lightroom...well worth a watch.